Necrognomicon Journey
Hi everyone! I’ve thought that it would be a good idea to post an article talking about what I’ve developed in Necrognomicon, just in case anyone has curiosity or want to know more about the development process.
The idea is not to dive into details, but instead talk about the mental processes behind the solutions adopted and the problems that have arised. It also could help other game developers so, if you have any questions I will be really glad to help!
What Necrognomicon is all about?
Necrognomicon is an action-strategy game, mainly action, where you have to stop hordes of evil garden gnomes. For that purpose you have a pretty funny arsenal of weapons and traps. There are two game modes available: Adventure mode and Survival mode.
Adventure mode
It’s the original mode in which the game was conceived, similar to Orcs Must Die. It consists of several sequential levels where you have to defend an emblematic Gnomeville building from waves of garden gnomes. Level difficulty grows up slowly at the same time that we introduce different types of weapons, traps and enemies.
Survival mode
Survival mode is pretty simple but yet addictive. Basically you have to survive as much time as possible. The player starts the game with the mailbox. Weapons, traps and player spawn points randomly change each try thanks to the loot table system. Difficulty raises by time.
Survival mode started as an extra official personal experiment. I’m pretty into the survival games genre and I thought it would be an attractive idea for events and demos. Finally survival was introduced as an official game mode. I want to thank my lovely designer Eva María Pérez for all her effort and work to make it possible.
My role at Necro
I’ve been mostly responsible for the game logic ( level system, difficulty system, enemy spawn, weapon and trap class hierarchy, damage system, and much more ).
I’ve also worked as technical designer helping design department analyzing how to implement the needed features.
I’ve built useful tools such as the grid component and the level reset system. I’ve also worked in several managers and utilities such as the cheat manager, score system, gameplay data extraction (needed for the design department for balance analysis). I even prototyped the lawn mower weapon!
Lastly I dived into developing survival mode and improving AI behaviours. Now that we are in context let’s talk about those interesting systems and functionalities.
Wow!! I am impressed with the amount of things I have learned in this project! Hi it’s me :D

Grid system and traps
As is known, we have looked on to Orcs Must Die (OMD) systems from the beginning of the development. We wanted to use traps to help the player with the waves of enemies. OMD grid was pretty useful to guide players placing traps, to distribute them uniformly, and at the same time it would prevent a lot of collateral problems of free placing traps in the scene.
At first we had a lot of problems developing the grid system. The first try was to implement an unreal actor matrix. ¿The problem? PERFORMANCE. Unreal editor literally exploded.
After a month I thought..why not give it a try? The main goal was to find the most efficient solution for rendering the grid because the design department had a huge town in mind. I had more questions to resolve other than that:
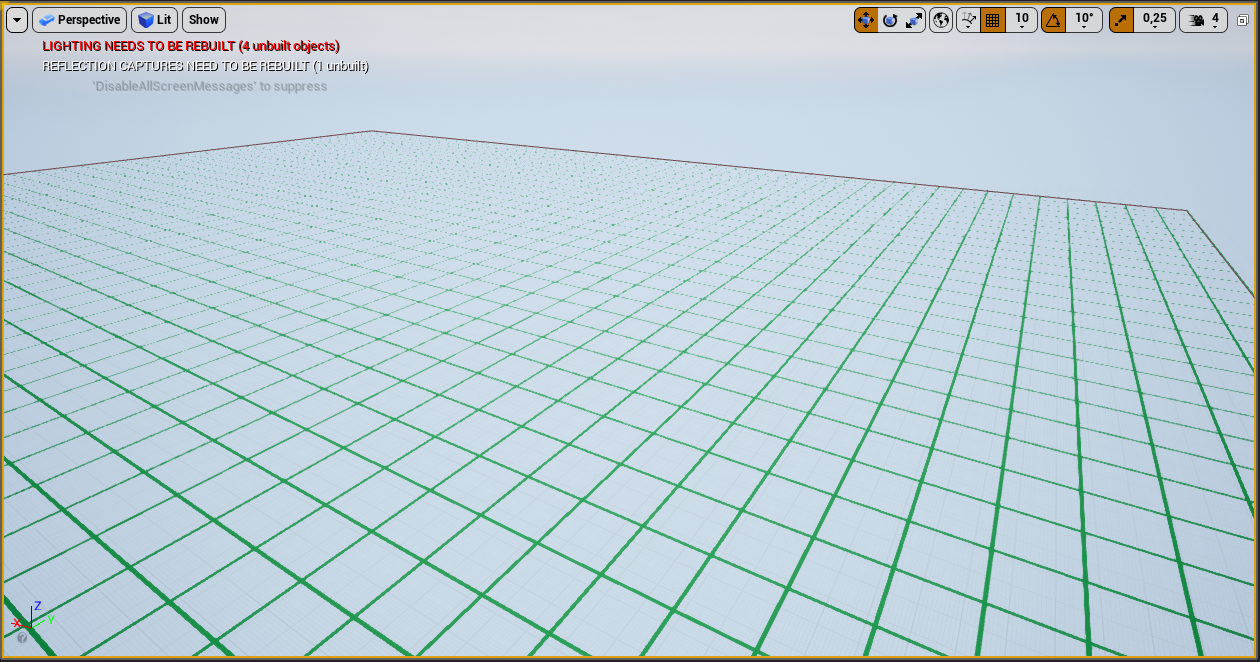
How to efficiently render the grid?
Draw vertical and horizontal lines simulating the grid, sending triangles directly to the graphic card thanks to Unreal Procedural Mesh Component. This is easy to get with some basic properties such as: NumRow, NumColumns and TileSize. The result was impressive!
I want to thank Reid’s Channel for his amazing videos about rendering the grid. His content is pretty good. You should check it out! https://www.youtube.com/user/Blindopoly
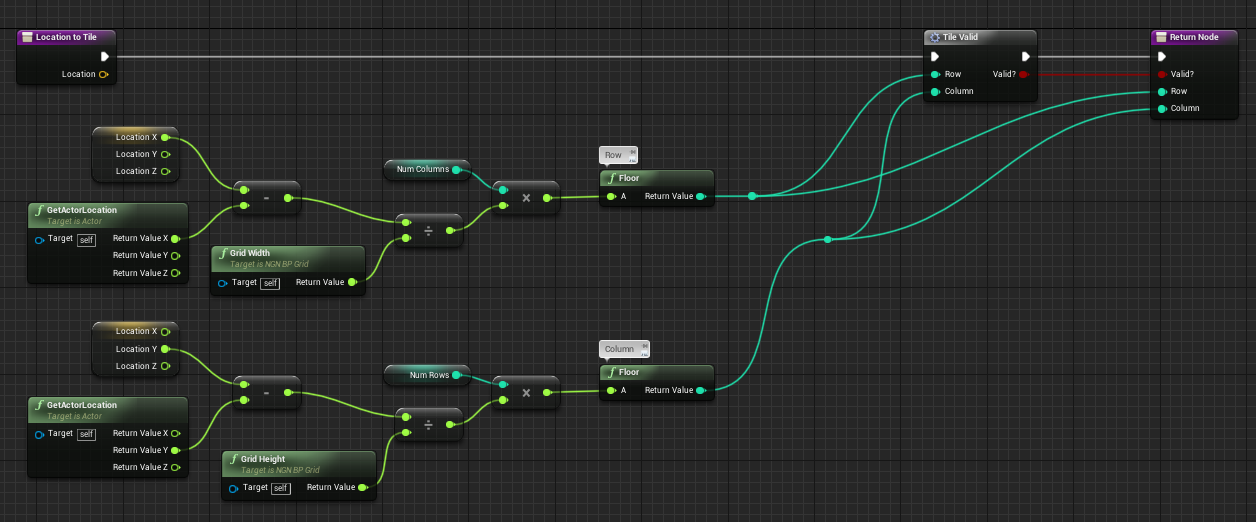
How to select a tile?
Doing Line Traces to see the row and column where we are going to place the equipped trap.
Thanks to TileSize property and the number of rows and columns we can transform world positions to grid positions.
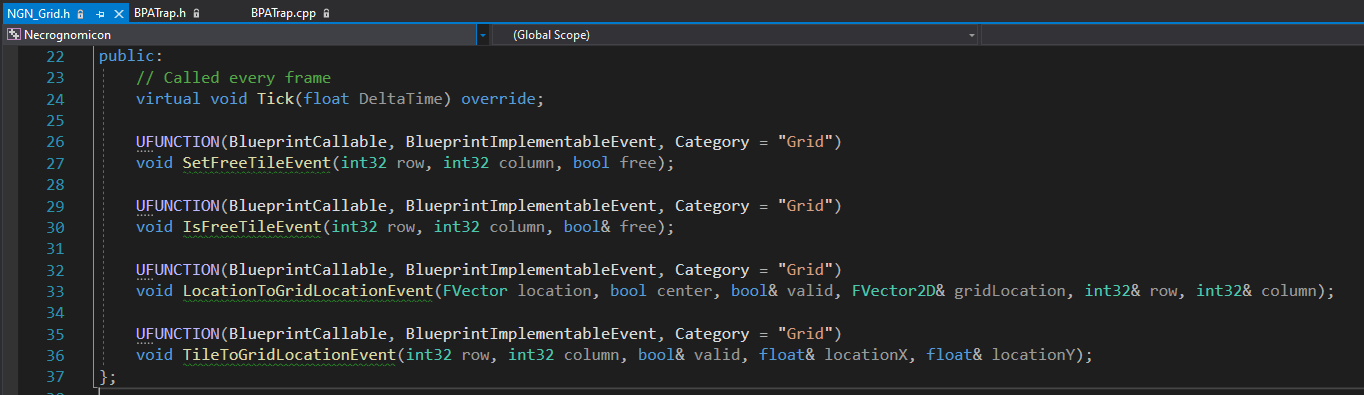
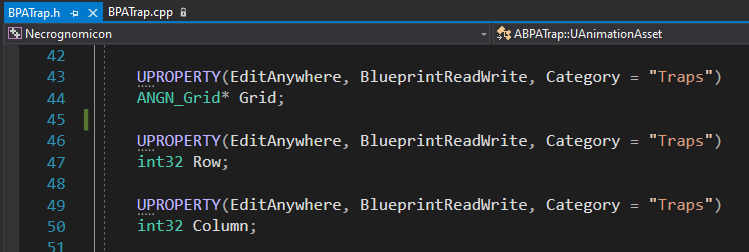
How to communicate C++ traps with the Grid BP?
Solution was to create a facade C++ grid class defining BlueprintImplementableEvent methods, but in reality all logic was implemented inside the grid blueprint. Here you can see some of the called methods.
How to configure the grid if Gnomeville is not..rectangular?
Instead of using a huge single grid I will use multiple smaller grids with different shapes and sizes. I had to make some changes to the current system, after doing the line trace I had to store the grid reference along with the row and column. All the operations from there were applied to that stored grid.
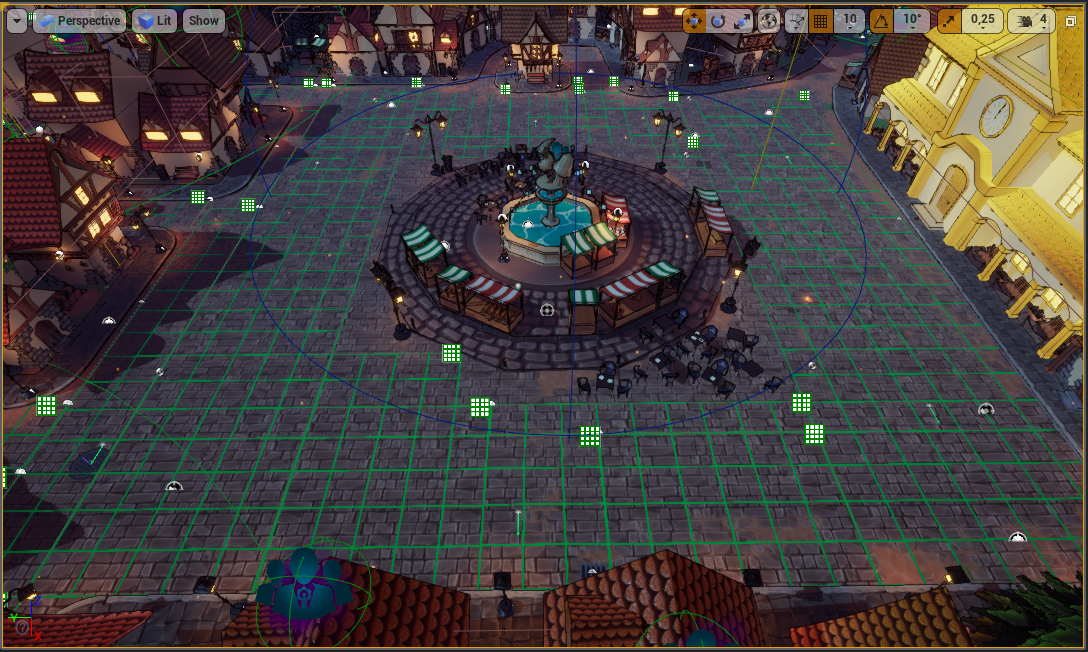
 Here you can see an example of Gnomeville with all grids configured. Every billboard you see is a different grid object instance.
Final result
It doesn’t seem like much, but was quite an adventure to implement.

AI Behaviours
Adventure mode enemies don’t have much movement freedom, they never get out of the navmesh. One collateral effect introducing survival mode was that gnomes don’t follow a predefined path anymore. There are new situations where the player jumps over some kind of obstacle, zones where the navmesh is incomplete, and the enemies get stuck without knowing what to do.
In adventure mode this problem was only evident when placing barrel traps forming a barricade, gnomes get stuck. We had to find a solution because the player loses all inmersion when that happens. Solution: Jumping gnomes.
Avoiding obstacles
Behaviour tree was updated giving our enemies the ability to jump over certain obstacles and chasing the player even outside the navmesh. Behaviour is simple but very effective:
- Am I Stuck?
- Move back a little bit (take a run)
- Face to objective
- Jump forward
 As you can see it’s a success! It even gives the impression that gnomes are much more intelligent than before.
This behaviour that was originally conceived for avoiding little obstacles has been extended to be a more versatile mobility tool in the arsenal of gnome behaviours. Below you can see some more real examples. As said before, this behaviour has been specially useful in survival game mode.
Out of the navmesh
Roof jumping
Fountain jumping
Wanderers
We had the feeling that GnomeVille town was too empty. Until you didn’t launch the horde you didn’t see any gnomes. Didn’t like that. The AI wanderer was created. This type of Ai wanders around the town until it perceives the player, once it does it alerts nearby radius gnomes to attack together.
Active Area System
A big part of survival mode was inspired by L4D2, I’m a fan. In concrete the ai systems of l4d writing by mike booth. Here you can check it out. It’s amazing! https://steamcdn-a.akamaihd.net/apps/valve/2009/ai_systems_of_l4d_mike_booth.pdf https://www.gamasutra.com/view/feature/134606/why_left_4_dead_works.php
We have implemented a basic Active Area System (AAS) that allows us to recycle enemies in different areas without the player ever knowing. Each area has a máximum N size of gnomes it will try to spawn, in case we can afford more enemies in the scene.
Difficulty System
We can talk about two difficulty systems depending on the selected game mode. A static difficulty system is implemented in adventure, while a dynamic difficulty system was made for survival.
Static difficulty system
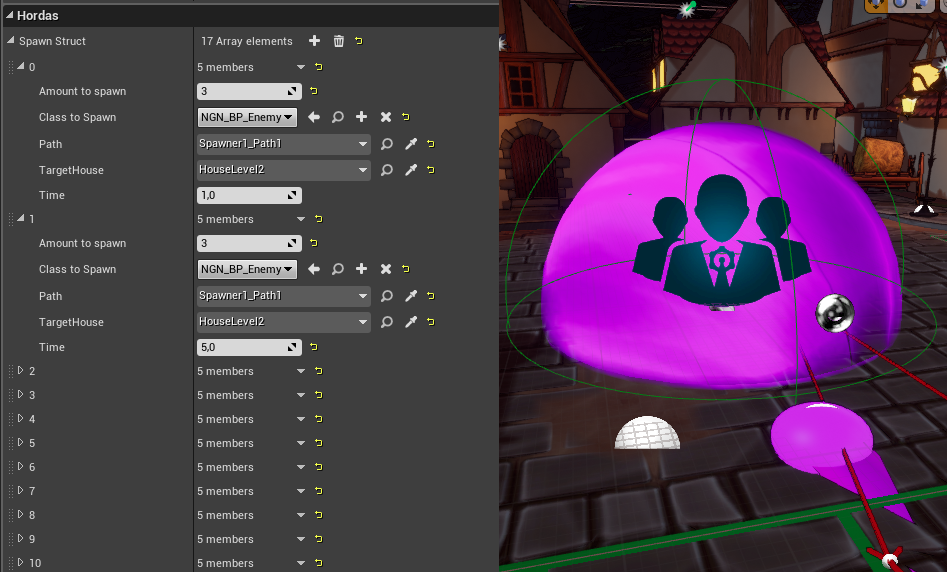
Adventure mode difficulty is done solely and exclusively manually by the design department. They configure gnomes quantity spawn, which types, how often, and so. Below you can see an example horde array configuration.
In fact, a little difficult system is in the background. When a player kills every single gnome of a wave before the next wave is activated it increments the difficulty factor by an amount. The gnome’s quantity in the next wave is multiplied by that difficulty factor which makes it possible to spawn some more gnomes.
Dynamic difficulty system
For survival mode we needed a difficulty system that scaled harshly with time, to make play sessions quick and snappy. We made it so that the longer the player survives, the more enemies spawn, and the more powerful they are.
I should write a full entry about dynamic difficulty system implementation, but for now I will try to give you an idea of how it works.
Applying a sigmoid function over time has provided us with fast but yet controlled difficulty factor increment. We generate a difficulty value by time, then we “spent” that value spawning gnomes of different types. Each type of gnome has its own cost associated. Also each type of gnome has an appearance percentage value. As you can see below in the graphs, the longer the player survives not only we spawn more gnomes but also fewer basic gnomes.
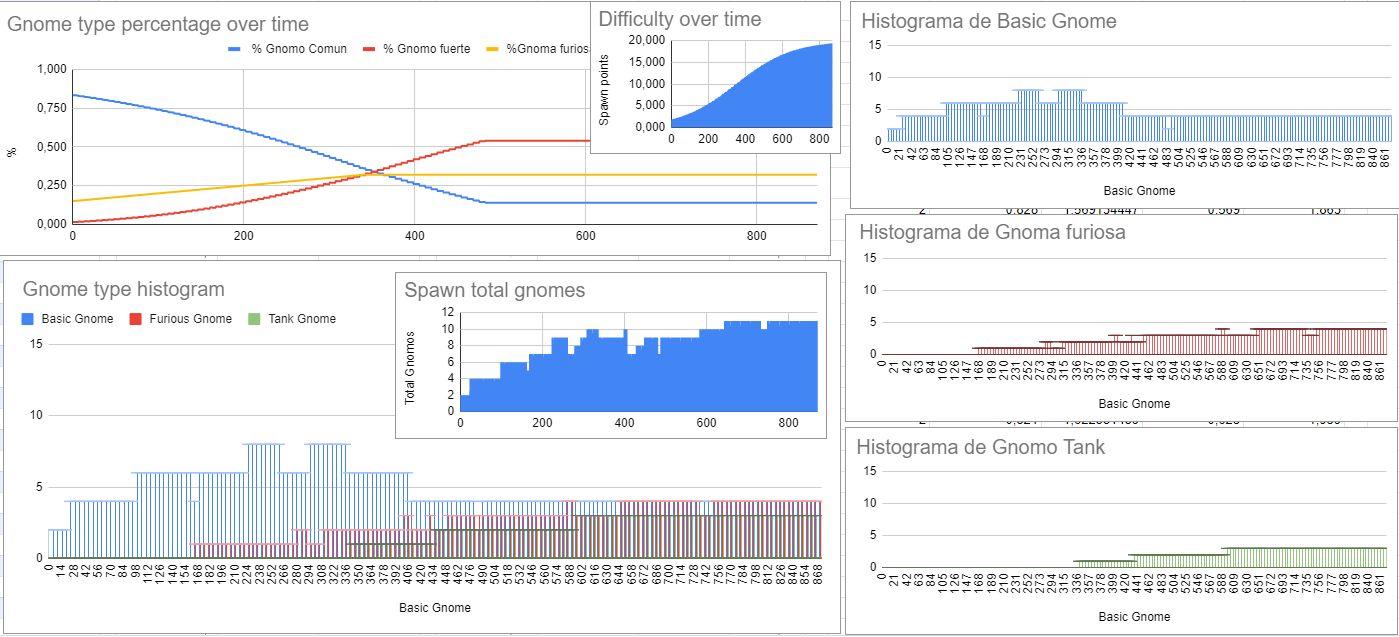
Difficulty value also modifies gnomes movement speed, which grows up until the maximum of double the initial value.
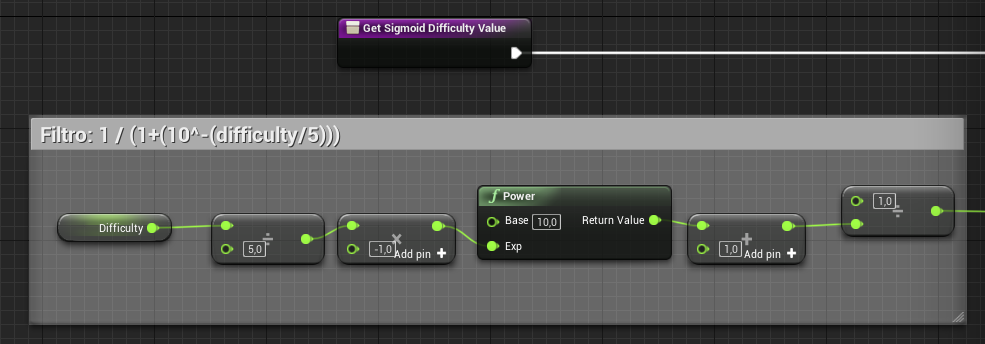
Difficulty variable increments by time by a certain amount, then the sigmoid function is applied to filter the current difficulty value.
Post process
I have special feelings for the post processes since it was the first functionality that I developed in Necrognomicon. It has been mainly used to highlight traps and weapons. It also helps the player by highlighting gnomes behind the buildings when they are attacking (this behaviour is integrated in the enemy behaviour tree)
Outline, in camera, occlusion
House enemy occlusion

Thanks Team
Last but not least, I want to thank the entire Necrognomicon team for the enormous effort and great teamwork throughout the year. I have learned a lot from all of you and I hope we continue to work together in the future <3
![]()
I hope you enjoyed the reading! :D